Envío gratuito a todo el mundo: prueba sin compromiso durante 30 días.
Seiko Watch Customization Guide: Build Your Unique Timepiece

Finding the right tools and high quality parts is the first step for any watch enthusiast ready to transform a Seiko into a personalized statement. Passion for craftsmanship drives this project, especially when aiming for unique design and affordable luxury. With the right approach and a careful selection of components, you gain the freedom to create a Seiko that reflects your style without needing a professional workshop. Careful preparation and smart choices ensure your custom watch build starts on solid ground.
Table of Contents
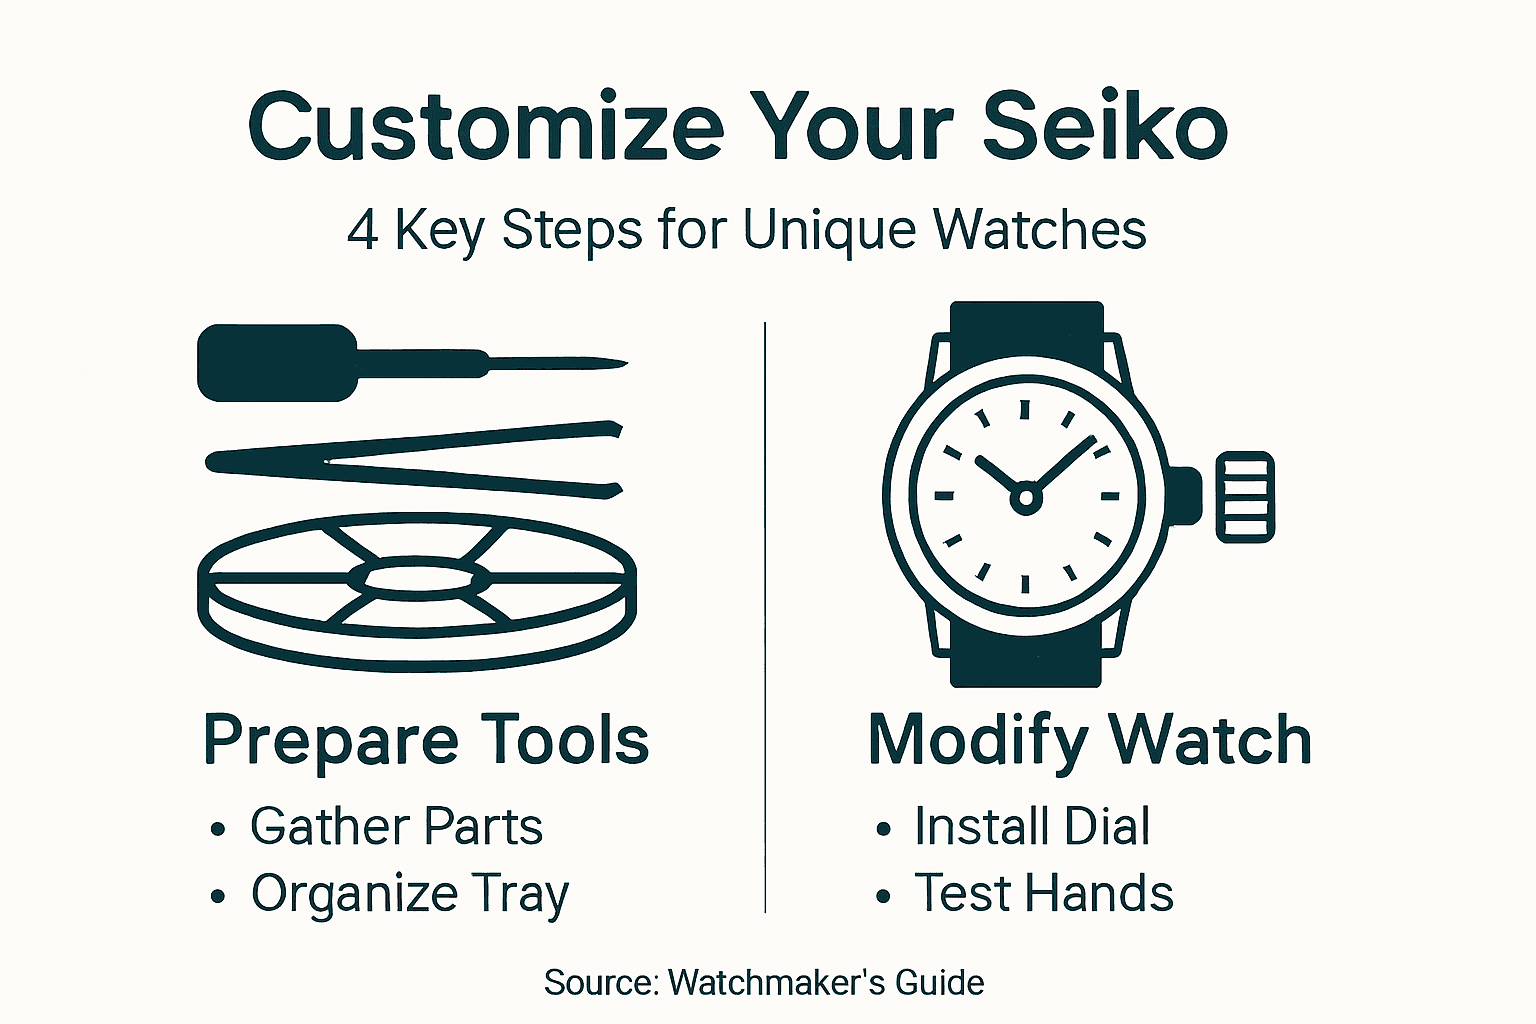
- Step 1: Gather Essential Tools And Custom Parts
- Step 2: Disassemble Your Seiko Watch Safely
- Step 3: Install Custom Components Properly
- Step 4: Reassemble And Inspect Your Modified Watch
Quick Summary
| Key Point | Explanation |
|---|---|
| 1. Gather Essential Tools | Use tools like spring bar tools, tweezers, and screwdrivers to prepare for watch assembly. Quality tools ensure precision and ease during the process. |
| 2. Choose Compatible Parts | Select dials, bezels, and cases that match your Seiko’s movement. Compatibility is crucial for a successful customization. |
| 3. Disassemble with Care | Identify your caseback type and use the right tools. Protect your watch during disassembly to avoid damage to delicate components. |
| 4. Install Components Methodically | Follow the correct order when installing the dial and hands. Precision in this step prevents damage and ensures proper function. |
| 5. Thoroughly Inspect After Assembly | Before wearing your watch, check for proper alignment, movement function, and water resistance. A detailed inspection ensures quality and reliability. |
Step 1: Gather Essential Tools and Custom Parts
You’re now at the exciting part: assembling your Seiko customization project. Building a custom watch requires gathering the right tools and components before you start.
Looking at your goal, you’ll need two categories of items: specialized tools for assembly and the actual watch parts that will transform your timepiece. The good news? You don’t need a professional watchmaker’s full toolkit to pull this off.
Essential tools you’ll need:
- Spring bar tool for removing and installing watch bands
- Small screwdrivers (0.8mm and 1.5mm sizes typically work best for Seiko movements)
- Tweezers for handling small components
- Soft brush to clear dust and debris during assembly
- Casing tools or caseback opener for accessing the watch interior
- Loupe or magnifying glass to inspect parts clearly
These tools cost far less than professional equipment, and quality options are widely available at reasonable prices. You can find starter watchmaking kits that bundle several of these together.
For the custom parts themselves, think about what makes your vision unique. Seiko offers compatible cases, dials, hands, and bezels across their catalog that you can mix and match.
Stock with quality components from the start rather than upgrading later. It saves time and frustration down the road.
The parts you select should match your watch movement size. Most modern Seiko automatic movements use specific case dimensions, so measure twice before ordering. This is where your Ottoman Prieur catalog becomes invaluable—you’ll find curated components already vetted for compatibility.
Start by listing exactly which parts you want to customize. A custom dial? A new bezel insert? A different case finish? Each component you swap changes the watch’s character. Document your selections so you stay organized during the build.
Pro tip: Order an extra gasket and spring bar when you buy your parts—these small items wear out quickly and having spares prevents project delays when you need replacements.
Here’s a summary to help you choose the right tools and custom parts for your Seiko project:
| Category | Example Items | Key Selection Criteria |
|---|---|---|
| Assembly Tools | Spring bar tool, tweezers | Quality, precision, durability |
| Custom Components | Dial, bezel, hands, case | Compatibility, design, finish |
| Spare Parts | Gaskets, spring bars | Longevity, availability |
| Equipment Bundles | Starter watchmaking kit | Affordability, coverage |
Step 2: Disassemble Your Seiko Watch Safely
Now comes the moment where you open up your watch and access its inner workings. Disassembling your Seiko requires patience, the right approach, and respect for delicate components that can break if mishandled.
Your Seiko likely has one of three caseback types: screw-back, snap-back, or a caseback with individual screws. Identifying which type you have determines your first move. Look closely at the caseback edge—if you see screw slots, it’s a screw-back. If the edge is smooth all around, it’s a snap-back.
Compare the main Seiko caseback types to prepare for disassembly:
| Caseback Type | Identification | Tool Needed | Disassembly Difficulty |
|---|---|---|---|
| Screw-back | Visible screw slots | Screwdriver or opener | Moderate |
| Snap-back | Smooth edged all around | Watch case opener tool | Easier |
| With screws | Multiple individual screws | Small precision drivers | Most challenging |
Before you start, protect your watch:
- Place a soft microfiber cloth on your work surface
- Rest your watch on the cloth to cushion it
- Keep another cloth nearby for wiping your hands
- Work under good lighting so you can see clearly
When you’re ready, use the appropriate tool for your caseback type. For screw-backs, select the correct screwdriver size to avoid stripping the screws. For snap-backs, a proper watch case opener tool prevents slipping and protects the caseback edge from ugly marks.
Hold the watch steady with one hand using a case holder or soft cloth while you work with the tool in your other hand. This prevents the watch from spinning and causing damage.
Once the caseback is open, you’ll see the movement and internal components. Before removing anything, take a moment to study what you see. Photograph the arrangement if you’re new to this—it helps during reassembly.
Next, carefully remove the stem and crown by gently pulling outward at a slight angle. Don’t force it. The movement should now lift out cleanly when you ease it upward using tweezers under the edges.
With the movement removed, you can access the dial, hands, and other components you want to replace or modify. Each part comes out in a specific order—study your movement type or reference guides beforehand.
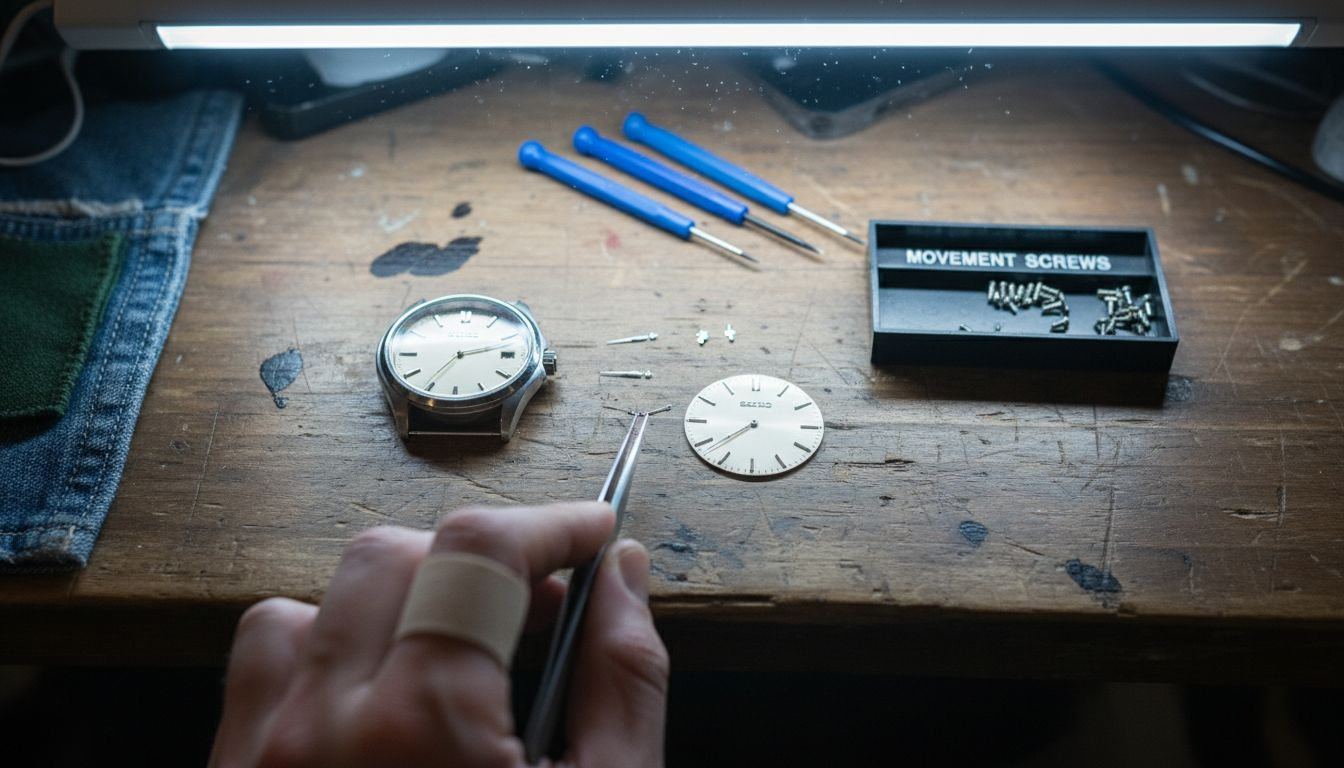
Pro tip: Keep all screws and small parts in a labeled tray or compartment box organized by location—finding a lost screw mid-project wastes hours of frustration.
Step 3: Install Custom Components Properly
This is where your vision becomes reality. Installing custom components requires precision, patience, and a methodical approach to ensure each part sits exactly where it belongs.
Start with the dial. Your new dial must align perfectly with the movement’s center post. Place it gently onto the post and rotate it slightly to ensure a snug fit. The dial feet should rest securely against the movement without forcing anything into place.
Once the dial is seated, install the hands in the correct order: hour hand first, then minute hand, then second hand. Each hand has a specific center hole that matches the movement post. Press each hand straight down using gentle, even pressure. If a hand resists, stop and recheck the alignment—forcing a hand damages both the hand and the movement post.
Installation sequence matters:
- Dial sits on movement first
- Hour hand installs before minute hand
- Minute hand goes on before second hand
- Check alignment after each component
Next comes your custom bezel if you’re swapping it. The bezel clicks onto the case ring with a satisfying snap when seated correctly. Rotate it slightly to ensure it’s fully engaged. If it feels loose after clicking, the bezel ring may need adjustment—don’t force it.
For the caseback, apply a fresh gasket or seal before closing everything up. A dry gasket causes leaks and water damage. Many custom Seiko builders use quality gasket material to ensure long-term water resistance.
Take your time installing each component. Rushing leads to misaligned dials, broken hands, and frustrated restarts that waste hours.
When reassembling, reverse the disassembly steps you documented earlier. The movement goes back in first, then the stem and crown, then the caseback. Hand-tighten screws in a crisscross pattern to avoid uneven pressure on the caseback.
Your custom dial and other visible components should now gleam behind the crystal. The watch you’re building is becoming unmistakably yours. Understanding complete guide to Seiko watch parts helps you identify compatible components for future projects.
Pro tip: Use a drop of quality watchmaker’s oil on the hand posts before installation—it allows hands to seat smoothly without resistance and prevents post damage.
Step 4: Reassemble and Inspect Your Modified Watch
You’re in the final stretch. Reassembling your Seiko is the reverse of disassembly, but this step demands even more attention since small mistakes now can ruin an otherwise successful build.
Start by placing the movement back into the case carefully. Guide it straight down, ensuring the stem hole aligns with the crown. The movement should sit flush against the case bottom without gaps or tilting. Once seated, gently insert the stem through the crown and into the movement. Rotate the crown slightly to feel it engage with the stem threads.
Now install your caseback using the appropriate method for your watch type. If it’s a screw-back, hand-tighten all screws first, then use your screwdriver to snug them in a crisscross pattern. This prevents uneven pressure that warps the caseback. For snap-backs, apply firm, even pressure around the edges until you hear the satisfying click of full engagement.
Inspection checklist before declaring victory:
- Dial sits perfectly centered and level
- All hands move freely without touching
- Crown screws down smoothly and locks tight
- Caseback sits flush with no gaps
- No visible dust or debris inside the crystal
- Watch powers on and keeps accurate time
With everything closed up, perform a water resistance test if your watch is meant to be water-resistant. A simple test involves breathing on the crystal—if condensation appears inside, your gasket needs adjustment or replacement.
Before celebrating, run your watch for 24 hours and check that it keeps reasonable time. A poorly regulated movement ruins an otherwise perfect build.
Check that your quality standards for custom watches match your expectations. The dial should shine without imperfections, the bezel should rotate smoothly if yours rotates, and the crown should feel solid.
Take a moment to appreciate what you’ve built. You’ve successfully created a one-of-a-kind timepiece that reflects your taste and craftsmanship. The watch on your wrist is entirely your design.
Pro tip: Let your finished watch sit for 48 hours before wearing it regularly—this allows all components to settle and helps you spot any issues that might have appeared during assembly.
Elevate Your Seiko Customization Journey with Expert Tools and Unique Designs
Customizing your Seiko watch can be a rewarding but complex project. From selecting compatible components to mastering precise assembly steps you read about, the detailed guide highlights common challenges like finding quality parts that fit perfectly and assembling them without damage. If you want to skip the hassle yet retain full creative control, our Seiko Mod Configurator offers a seamless solution. It empowers you to design your unique timepiece using expertly curated components that ensure perfect compatibility and craftsmanship.

Discover how effortless and inspiring watch customization can be when you have access to premium, ready-made options that align with your vision. Visit Ottoman Prieur to explore collections like Seiko Mod Royal Oak and bring your dream watch to life with confidence. Take advantage of free worldwide shipping and a 30-day money-back guarantee to start building your signature timepiece today.
Frequently Asked Questions
What tools do I need to customize my Seiko watch?
To customize your Seiko watch, you’ll need some essential tools like a spring bar tool, small screwdrivers, tweezers, a soft brush, and casing tools. Gather these items to ensure you can assemble and disassemble your watch without damaging any components.
How do I disassemble my Seiko watch safely without damaging it?
Disassemble your watch by first identifying the caseback type: screw-back, snap-back, or with screws. Use the right tool for your case type, and ensure to work on a soft surface with good lighting to prevent slipping and damaging parts.
What is the installation sequence for custom components on my Seiko watch?
Install components in this order: first the dial, then the hour hand, followed by the minute hand, and finally the second hand. This sequence is crucial because it ensures proper alignment and prevents damage to the movement.
How can I ensure my custom Seiko watch is water-resistant after reassembly?
To ensure water resistance, replace the gasket before reinstalling the caseback and conduct a simple condensation test after assembly. If condensation appears, adjust or replace the gasket to prevent water damage.
What should I check after completing my Seiko customization?
After completing your customization, inspect that the dial is centered, hands move freely, and the crown screws down smoothly. Allow the watch to run for 24 hours to check for accurate timekeeping and to verify that everything is functioning correctly.
Why is it important to order extra spare parts for my Seiko customization?
Ordering extra spare parts, like gaskets and spring bars, helps avoid delays during your project if any components wear out or get lost. Having spares on hand can save you time and frustration as you work on your customization.